
Teacher guide
Get your class building games today — four steps and you're running. Everything else about GameSalad for Education is here for when you need to look it up.
Go to GameSalad Creator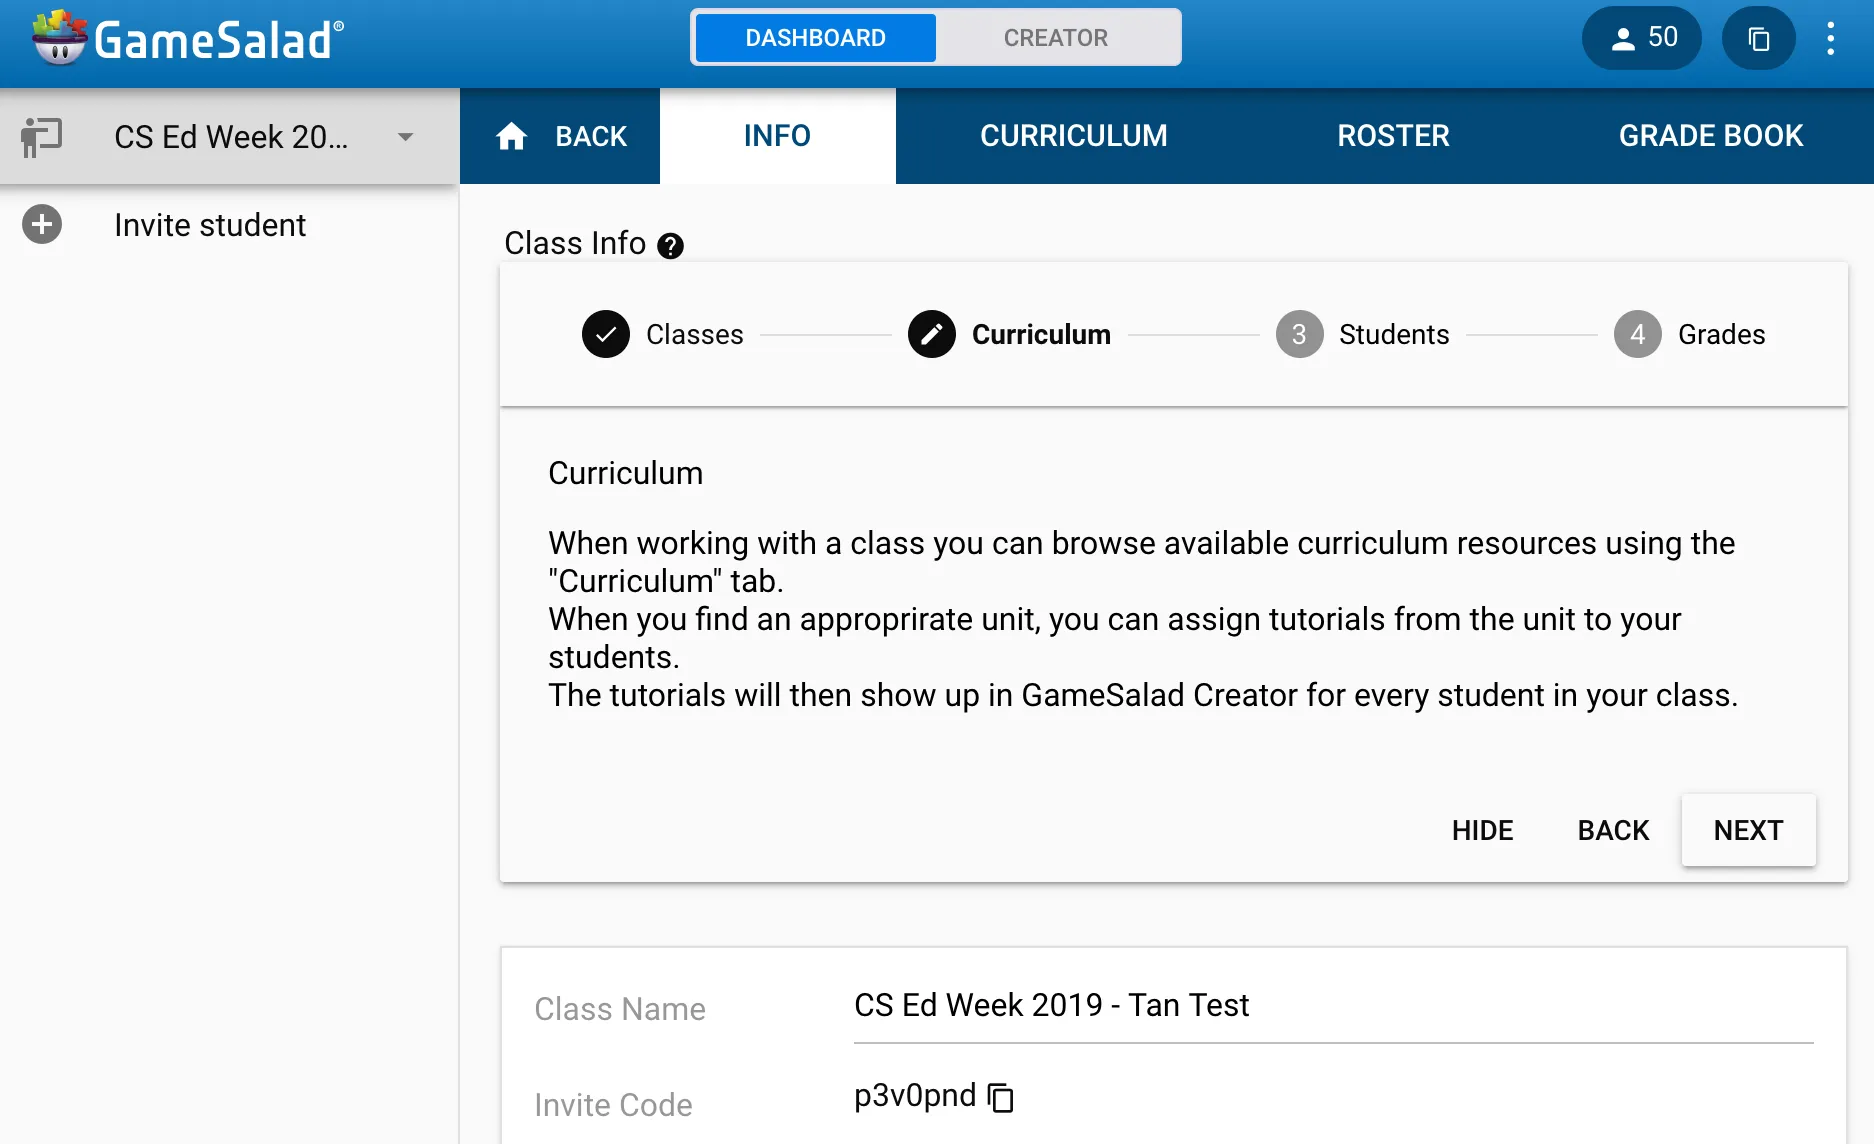
Before you start
GameSalad runs on any computer with internet access and a modern web browser.
- Google Chrome is recommended.
- Minimum 2GB of RAM.
- No installation — students and teachers work at creator.gamesalad.com.
URLs your IT team needs to whitelist
If your district filters web traffic, send this list to IT before your first class.
| URL |
|---|
https://auth.gamesalad.com |
https://creator.gamesalad.com |
https://creator-api.gamesalad.com |
https://cdb.gamesalad.com |
https://fonts.gamesalad.com |
https://classroom.gamesalad.com |
https://classroom-api.gamesalad.com |
https://gsso.me |
https://embed.gsrca.de |
https://arcade.gamesalad.com |
https://publish.gamesalad.com |
https://edu-content.gamesalad.com |
Get your class running
Four steps take you from signing in to students working on their first assignment.
Step 1: Log in to GameSalad Creator
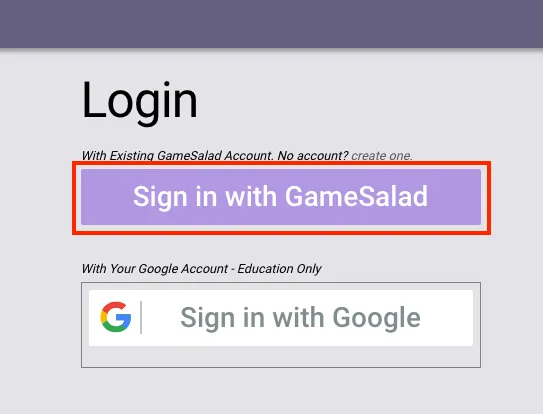
Go to creator.gamesalad.com. If you are not already logged in, you will be prompted to log in. Click Sign In With GameSalad and use the same credentials you gave us when setting up your account.
Step 2: Invite your students to your classroom
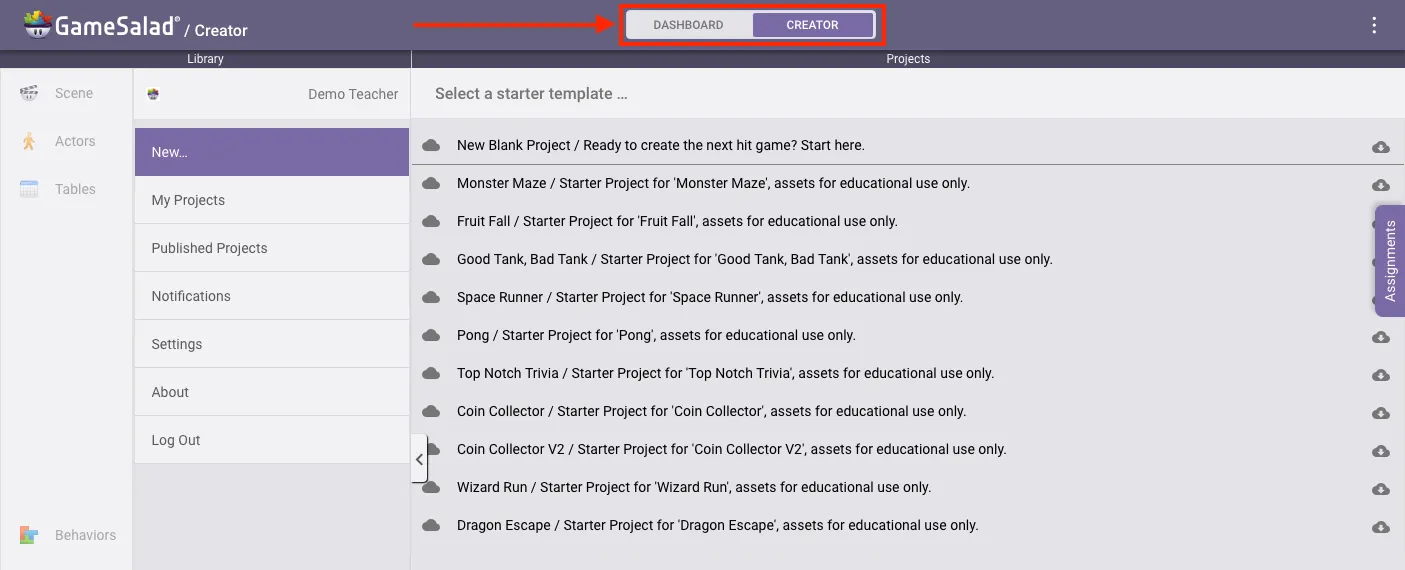
At the top of the screen you'll see two tabs. These are only available to you, as an instructor. Click on Dashboard:
You will now be taken to the Teacher Dashboard:
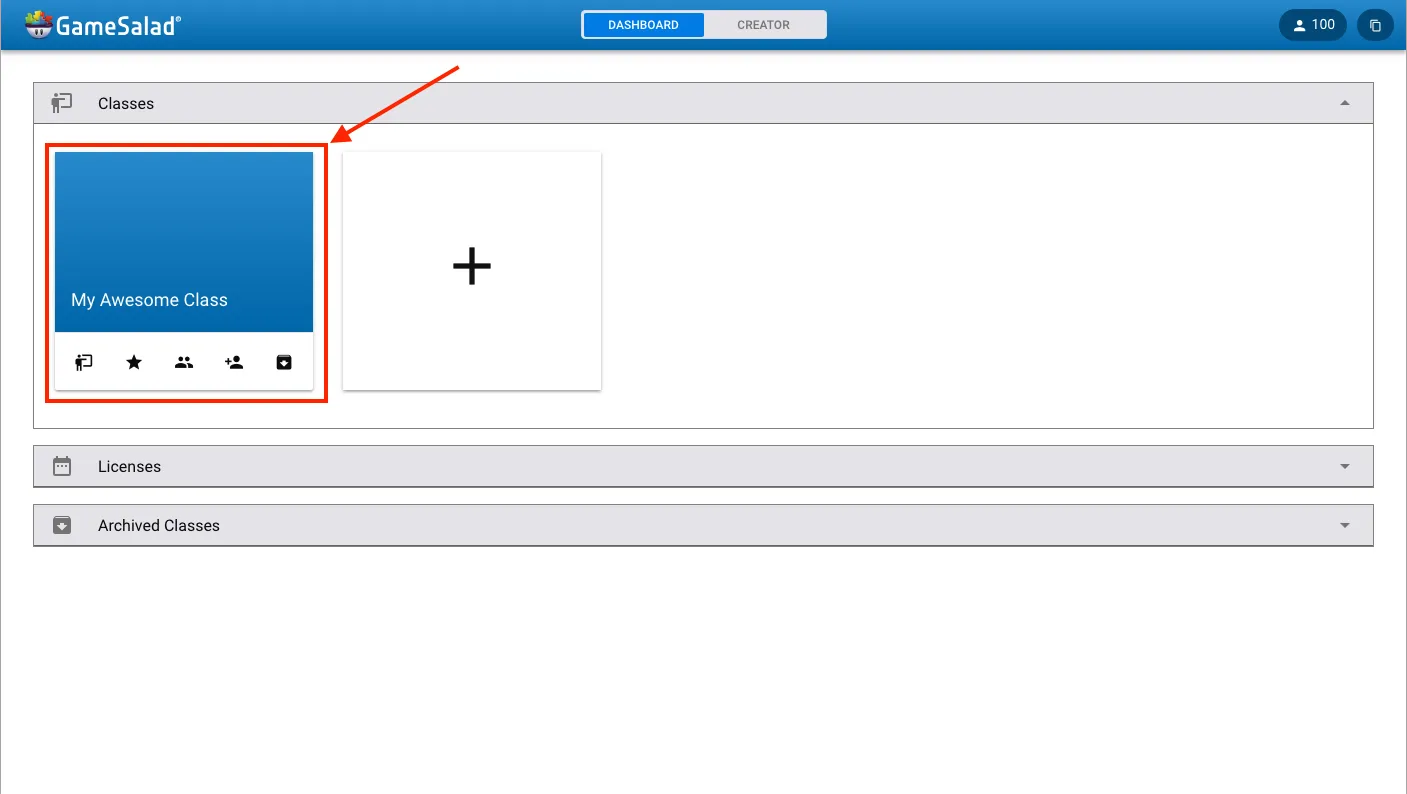
Your class will say something like "myemail@mydomain.com's Class". Click on that to be taken to your class management screen:
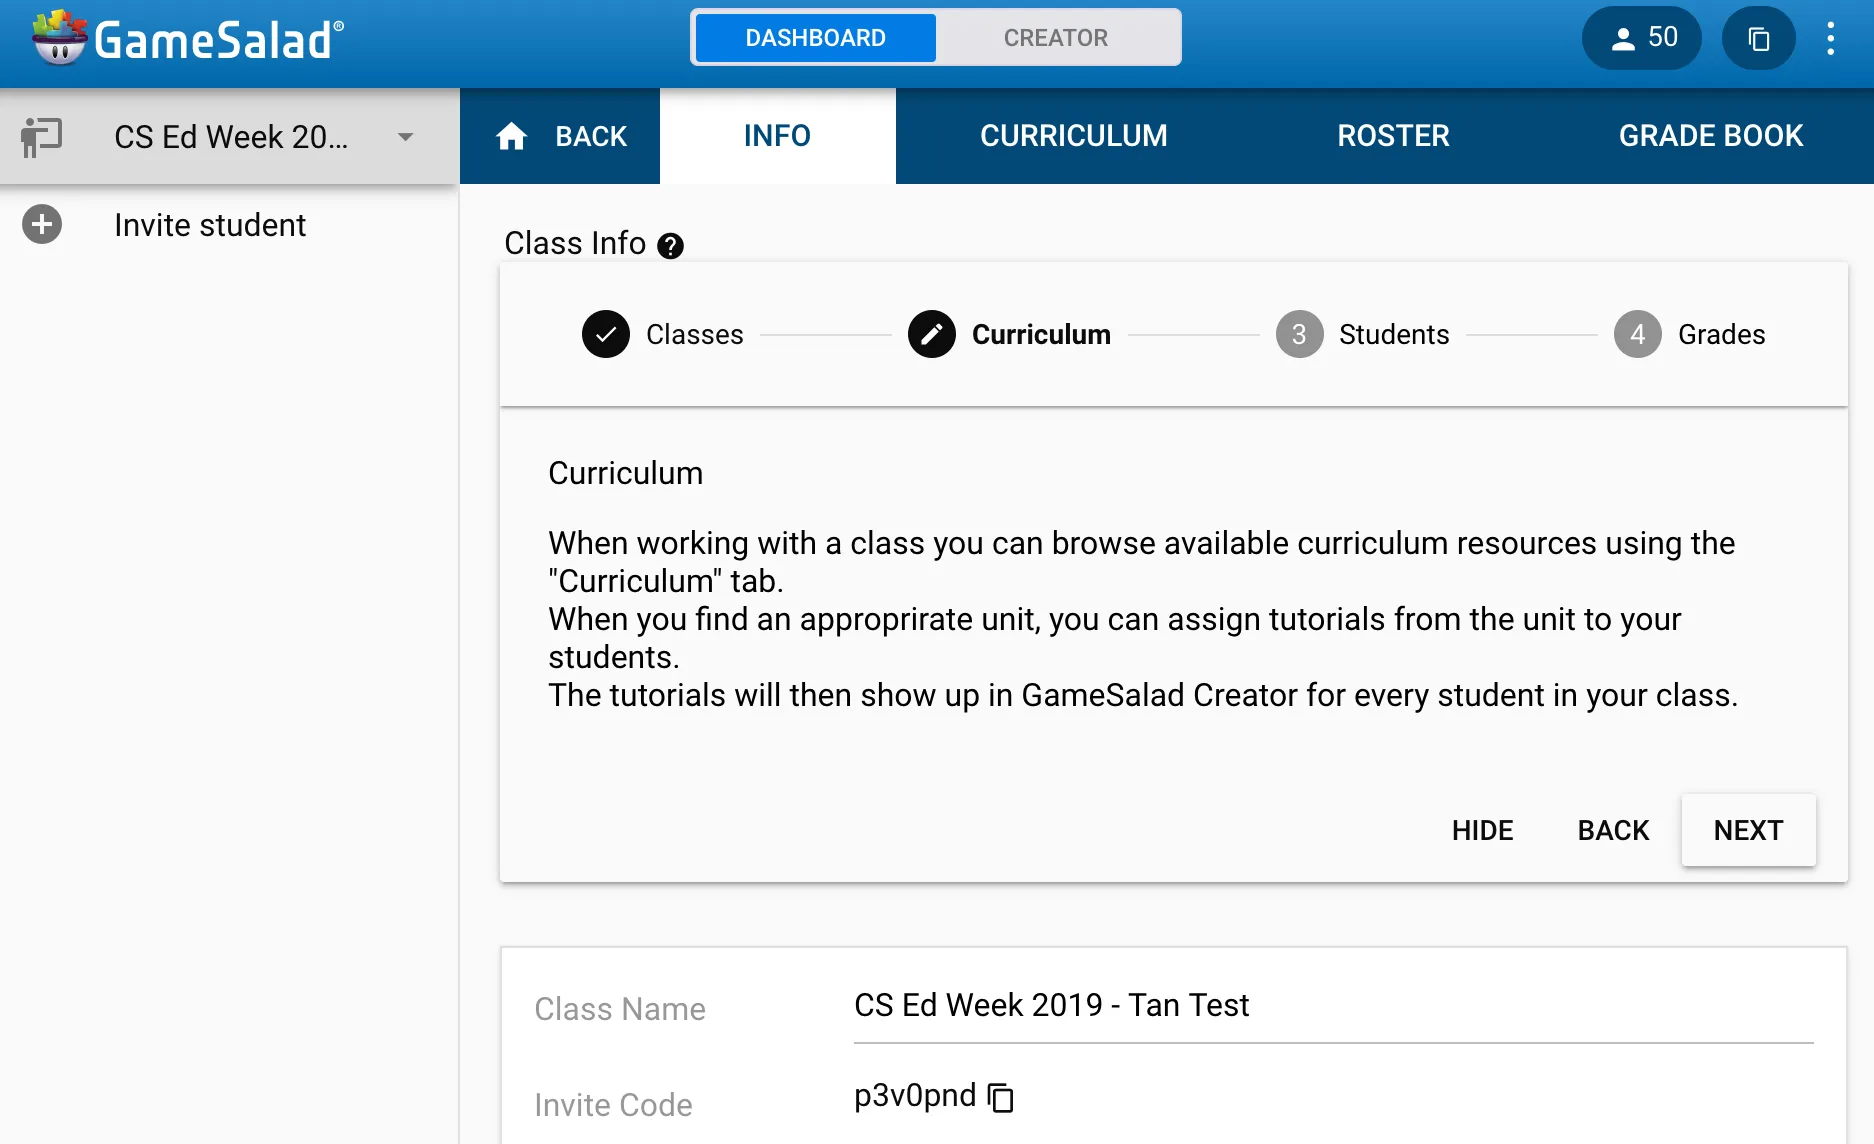
Click on Invite Student and you will see an invitation URL:
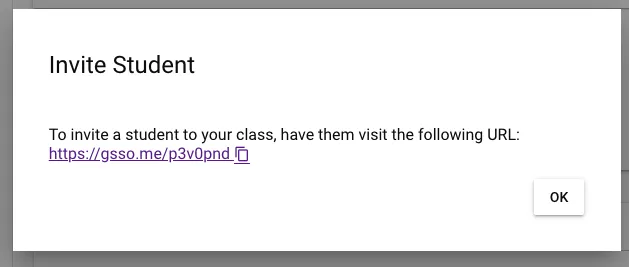
Have your students go to that URL and begin the sign-up process. If a student is under the age of 13, we suggest that they do not use a real email address. They also have the option of signing up via Google Sign-In. Full details, including first-time login: Add students to your class.
While they are going through that process, assign a tutorial.
Step 3: Assign tutorials to your students
While your students are setting up their accounts, it's time to look at the list of lesson plans. Click on the Curriculum tab to see a list of lesson plans. (Step-by-step help: View curriculum and assign lessons to your class.)
You can browse through the lesson plans to see the same lesson plan materials teachers have available to them, including worksheets and offline activities to introduce computing concepts not covered while making video games, as well as other materials to reinforce what students are absorbing as they create games.
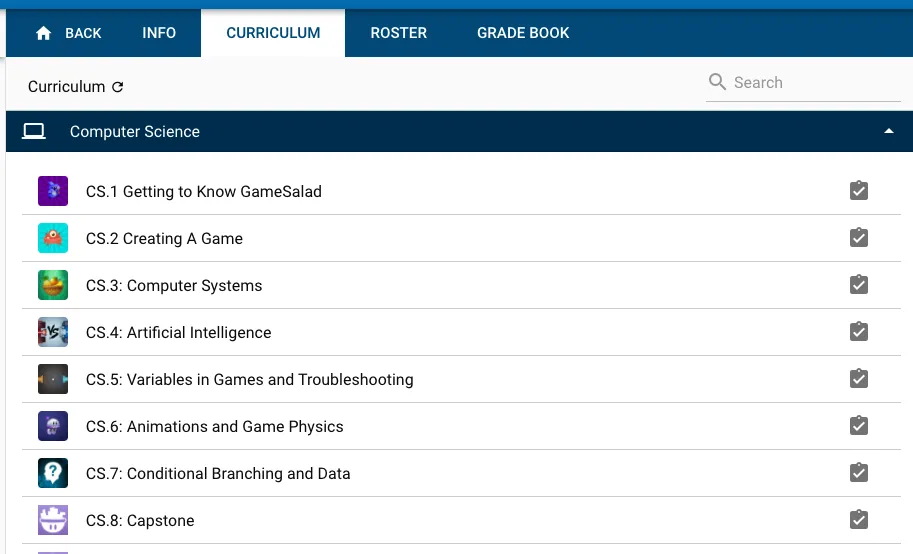
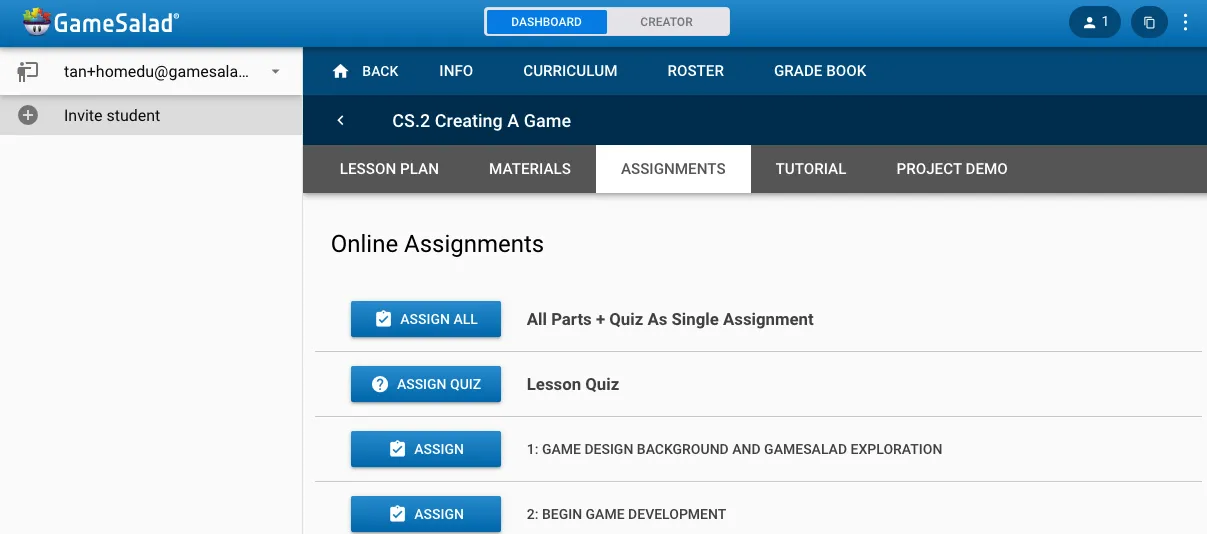
We suggest starting with CS.2 Creating A Game. Click on the Assignments tab. You can determine your students' pace: in most cases you can just hit Assign All and your students are ready to go with all the steps they need to create the unit's game. If you want to space out their work or limit their time on GameSalad, you can assign smaller sections of work instead.
Step 4: What your students will see
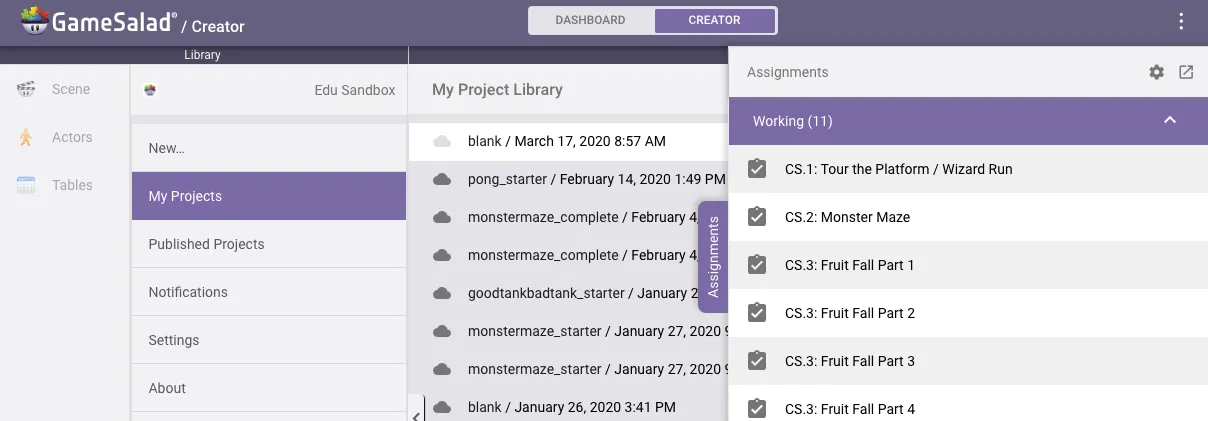
Your students will see assignments show up in a drawer in GameSalad Creator.
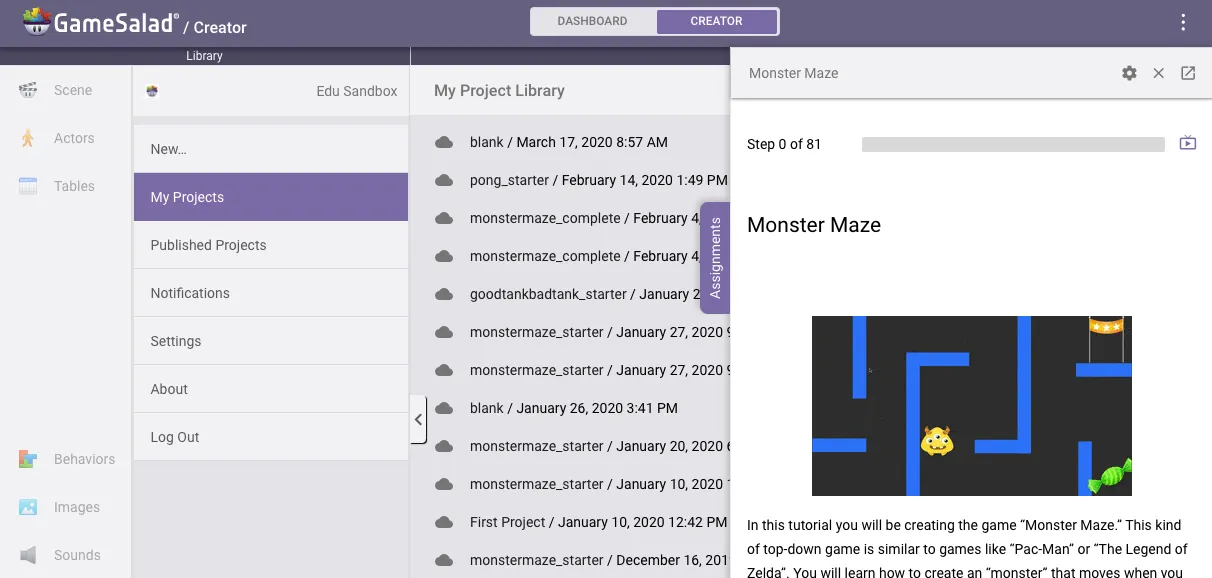
Clicking on an assignment starts showing them step-by-step instructions. A small video icon to the right of the progress bar means video tutorials are available as well as the basic text tutorials.
Your first lessons
Choosing games and lesson plans
Review the lesson plans and tutorials to determine where you want to focus your students' time. Also consider:
- Are state standards part of your focus? Our curriculum is standards aligned to CSTA, ISTE, and others — see all standards alignments.
- Is interactive teaching valuable to your students? The lesson plans are full of classroom activities.
- Is game design your primary learning objective? The tutorials give your students a foundation on which to spend time creating original games or components within the provided games. Image and sound assets are easily imported into the platform. Customization of the tutorials, extra levels, and completely original games are all ways to use the editor.
Suggested sequence
Digital Citizenship. The Digital Citizenship units contain essential information on how to navigate the internet safely and responsibly, but they do not contain a tutorial game. GameSalad includes two versions of the unit, one for younger students (CS.A) and one for older students (CS.B). Choose which is most appropriate for your class.
Why Computer Science? Another unit which contains in-class lessons only. Students explore components of computer and technology use. You can choose where to place this lesson in the curriculum.
Wizard Run or Monster Maze. Both Wizard Run (CS.1) and Monster Maze (CS.2) are good starting points after Digital Citizenship.
- Wizard Run is a shorter unit that introduces students to the GameSalad interface. It comes with a completed game, and the students lay out a new level for it. You can choose whether to complete this unit together as a class — a good option for younger learners, with the teacher reading the tutorial and explaining the platform components to the class.
- Monster Maze jumps right in to students building their own games and is more engaging, while also covering the basics of the Creator interface. Generally students excel when completing units at their own pace. Monster Maze and most of the other tutorials include videos as well as written instructions, so different types of learners can absorb the material.
After Wizard Run / Monster Maze. The curriculum is designed to be very flexible and modular. We list the units in order of increasing complexity, but what you do after students have been introduced to the platform can vary based on many factors, such as how much time you have the students each week.
A student who has completed Monster Maze (CS.2) would be able to complete a more complex game like the platformer in CS.6 (Space Runner), so the main limiting factor is time. If you can only complete three units during your class time, something like this is a valid option:
Digital Citizenship → CS.2 (Monster Maze) → CS.4 (Good Tank, Bad Tank) → CS.6 (Space Runner)
Capstone Game. The last CS unit, Capstone Game (CS.8), is for students to break off into groups and create a game from scratch using the things they've learned throughout the class. Refer to the lesson plan for this unit for more details.
Grade levels: who should use GameSalad?
GameSalad adapts to diverse learning needs and students' prior programming experience.
- 4th–5th. Advanced students who have already completed other coding programs may do well in the GameSalad platform. Contact us about a trial to see if GameSalad fits your young learners.
- 6th–8th. Perfect for middle school learners — open-ended programming and a visual interface move students forward, beyond simple coding exercises.
- 9th–10th and beyond. A great introduction to programming for older students. GameSalad engages students in building their own projects without the frustration of traditional coding syntax.
Understanding the Creator interface
The best way for an instructor to learn the Creator interface is the same way the students do — jump right in. Join one of your own classes, assign yourself the CS.1 Wizard Run and CS.2 Monster Maze student tutorials through the Teacher Dashboard, and complete the steps just as a student would.
Or review this fast-paced teacher-facing recording, in which our trainer Braydon builds the first game just as the students would. Pause, rewind, and repeat to fit your learning style.
Teacher Dashboard
The Teacher Dashboard is where you view the provided lesson plans, assign tutorials, manage your classroom, and view student progress. It is accessed via a toggle at the top of your screen when you log in at creator.gamesalad.com, and it is only visible to teachers.

Lesson plans
We provide content on computer science fundamentals and programming concepts. Our curriculum is:
- Standards aligned — to CSTA, ISTE, and others. See all standards alignments.
- Teacher-led — including hours of in-class lessons and activities.
- Project based — lessons are tagged with points at which to incorporate a Creator tutorial, so you can alternate lessons and game-building.
Tutorials: game-building guides
Students build working games by following detailed instructions. Project-based learning helps them understand how programming works as they build. Each tutorial introduces additional programming concepts, and tutorials include videos and written step-at-a-time directions with screenshots.
Students log in at creator.gamesalad.com and see only the tutorials you have assigned through the Teacher Dashboard.
Grading
Two types of assessments help you evaluate student progress:
- Quizzes cover the learning objectives of the lesson plan content.
- Rubrics guide you in assessing the tutorial games students have built.
GameSalad Creator
Editor
Commonly referred to as "GameSalad Creator" or "Creator", at creator.gamesalad.com. Students and teachers always begin by logging in here. This is where students build their games and take quizzes, and where teachers switch between the editor and the Teacher Dashboard.
GameSalad is an open-ended game design platform used by professional game developers. Students access a world of possibility where their own ideas can come to life, by writing instructions in order to achieve the desired game effects — the platform allows rules, actors, and behaviors to be added into the program freely. The game-building tutorials show students exactly how to create the specified project; often there are several ways to achieve the same programming result, some more complex than others.
Auto-save
Creator auto-saves after each change that is made. When a save is taking place, a quick message appears in the bottom left-hand corner of the interface. If your network is busy, the auto-save may take a moment or two to complete.
Always look to the bottom left-hand corner of the screen to confirm that the last steps have been saved — look for the successful auto-save message — before closing a project or previewing.
Viewer app
The GameSalad Viewer app is available on the major app stores and lets students keep and play their creations directly on their mobile devices. See How do I use the GameSalad Viewer? for setup steps.
Previewing
Previewing the game is the best way to stay on track while coding. It's easy and fun, because you get to briefly play the game you are building in order to check its functions. Preview by clicking the green play button in the top right corner of the Creator interface.

Some common programming errors show a red warning message as students code, but because the interface is open-ended, other errors only reveal themselves on reviewing the code or previewing the game. Previewing often limits debugging to the last section of code written: if your game works as intended when you preview and play it, you can move on to the next piece of code.
Beginning students should preview very often. For example, students should attempt to walk through the walls they have just built in Monster Maze, move their actors as intended, and test other elements of the scene, in order to try to "break" the game. If the platform is having trouble loading the preview, there is likely an issue with the logic that has been written.
Debugging
Help students "think like a programmer". Game development is an iterative process: after every change you make, you should test your changes, then modify the game again until it looks and acts the way you want. Students need to use the iterative process as they build, even when following the tutorials.
With GameSalad, students can debug with On/Off buttons to pinpoint problematic rules without having to delete and recreate them. The On/Off buttons are located in the top left corner of every behavior.


When a rule is toggled "off", the platform behaves as if it is not there. When a rule is toggled "on", the platform reads and tries to execute the rule when the specific conditions are met.
If a game is not behaving properly, try previewing with a certain rule toggled off. Start by turning off the most recent rule added, then preview. If the game then works correctly, the problem is in the rule you just turned off. If it's still not working, continue turning rules off one at a time and previewing in between to narrow down where the problem is.
If you have tried to determine where the trouble is and cannot find it, email support@gamesalad.com with the URL of the game and some details of what's not working correctly.
Publishing and the GameSalad Arcade
The GameSalad Arcade allows users to publish for free. Students can choose to share URLs for their games to be played online on any computer.
Going beyond the tutorial
The GameSalad platform adapts to learners at different levels of proficiency and programming ability. All students can be successful, engaged, motivated, and challenged.
- Students are invited to build the games as specified; no additional programming is required. Even when following the tutorial, there is room to customize the look and function of the game and make it their own.
- Students are also welcome to go beyond the scope of the tutorial — creating additional levels, increasing the complexity of the rules, adding actors and behaviors. Some students may even be ready to create their own original capstone game from scratch.
- This is where GameSalad shines: students are not limited to the exact programming in the tutorial.
- Students can easily import their own graphics and sounds, though images and sounds are already provided within the templates for each game. You can help them find free assets online that are appropriate for classroom use — see How can I get more assets for my projects?.
Student collaboration
Students can collaborate on the same project at the same time. Because the platform auto-saves, this is straightforward to do.
- Choose one student to create the project in their account. The project will always live in that student's GameSalad account.
- Rename the project to something unique that all the students in the group will remember. Have the student who created the project share the project link with the other students.
- All students navigate to this link on their own computers and begin working.
The project will auto-save in the original student's GameSalad account.
Have the students practice good communication in order to work on separate parts of the project, so they don't overwrite what another student is doing. For example, they can each work on different actors, different levels, or whatever works best for that collaboration.
Getting help
Email
support@gamesalad.com — include the URL of the game and details of what's not working.
Phone
1-844-837-8387
Help desk and FAQ
Start with the GameSalad for Education FAQ or search the help desk.
Forums
Ask the wider GameSalad community at forums.gamesalad.com.
Ready to bring GameSalad to your classroom?
Tell us your grade levels, student count, and start date, and we'll put together a quote or walk you through a demo.
Request a quote